Creating a Website for your Sage Interact
Setting up the website
1. Create a Github Account
-
Follow the official instructions for Creating an account on GitHub
-
We will be creating public pages. Everything you upload will be visible on the web. Also carefully read their privacy policy.
-
We will only use free features. You should not need to add any payment information at any point.
2. Create a New Repository
Full instructions are avalable on the Quickstart for GitHub Pages
Abbreviated instructions with some commentary are given below
-
In the title bar, click the
+symbol, and selectNew Repository.
-
Add a descriptive Repository Name using lower case letters and hyphens. If I am going to make a Sage interact about tangent lines, I could select
tangent-interact -
Scroll down and Turn On the
Add README. -
Click
Create repository
Understanding your repository
-
The web address or URL of your repository will depend on your User and Repository name.
Using User namestephen-floodand Repository nametangent-interactI gethttps://github.com/stephen-flood/tangent-interact -
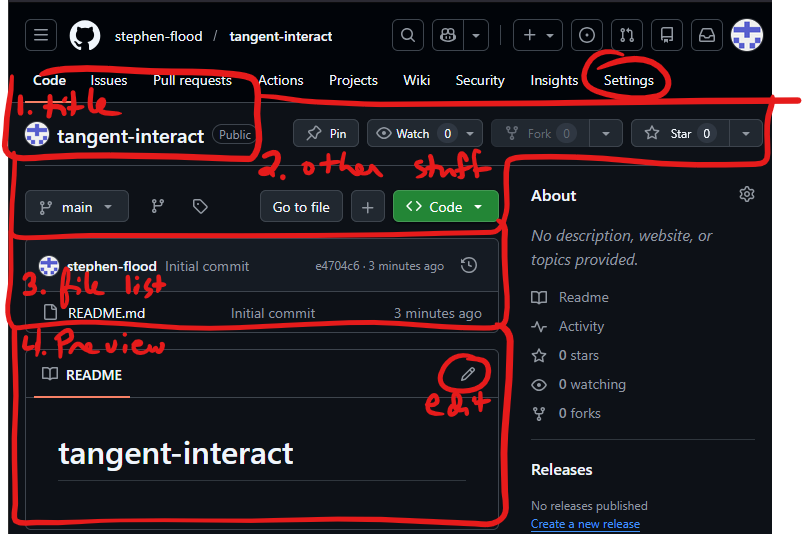
When you visit that page, you will see several rows of information
- The title of the repository
- Some things like
Pin,mainandCodethat you don't need to worry about now. - A list of the files in the repository. Right now, that should just be
README.md - A preview of what the
README.mdfile looks like. To the right of the filename, there is a pencil. Click on the pencil to edit the file.
Visually, the same information is conveyed in the following image
Troubleshooting: Do you see some confusing messages about getting started? You probably forgot to click Add README.md.
3. Configuring the Website
-
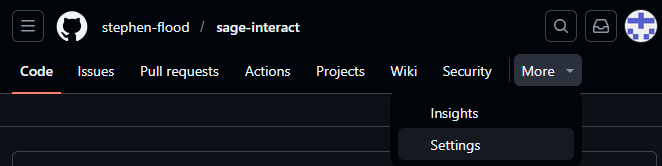
In the menu bar at the top of the page, select
Settingsif you see it. Otherwise, clickMoreand thenSettings.
-
Scroll down the list on the left until you see
Pages. Click on that link.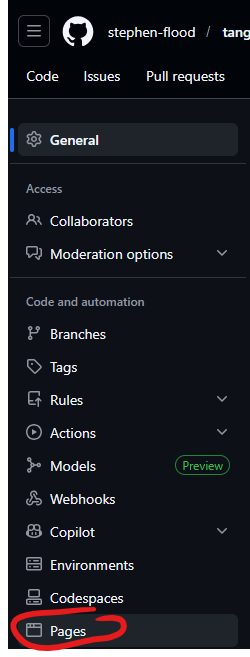
-
In the page that comes up,
- Under
Branchclick on the dropdown (originallyNone) - In the menu that comes up, click
main - Click
Save - At the top of the page, you should see your repository name (such as
tangent-interact). Click here to return to your main GitHub Repository.
- Under
You can access the new webpage at
https://user_name.github.io/repository_name
For example, if your username is stephen-flood and the project name is tangent-interactive, you can view your new webpage at
https://stephen-flood.github.io/tangent-interactive
Right now, you will only see the project name in large bold letters. Next, you need to add content of your own.
Writing a Basic Website
The process is to 1. edit the page source, 2. preview what your page will look like. 3. commit those changes to update your webpage.
You may need to wait a few minutes before your page is updated.
You can access the new webpage at
https://user_name.github.io/repository_name
For example, if your username is stephen-flood and the project name is tangent-interactive, you can access the new webpage at
https://stephen-flood.github.io/tangent-interactive
Embedding Sage Code
We are now ready to embed a Sage interactive in our page. The instructions below were used to create this tangent line interactive with this source code.
The following is adapted from the instructions from Sage for Undergraduates, with the addition of a function to insert alt-text into the final graphic. You don't need to worry about the details.
You can find a full blank template file here. That document is divided into three parts: 1. Setup Scripts 2. Descriptive Content 3. Sage Code
You only need to insert the Setup Scripts once per file. You can alternate Descriptive Content and Sage Code within a file to illustrate multiple concepts.
Note that comments in Markdown are written using the following syntax:
<!-- your comment -->
Part 1: Setup Scripts
Copy the following code into the top of your markdown file.
<!-- Part 1: Setup Scripts -->
<script src="https://sagecell.sagemath.org/static/jquery.min.js"></script>
<script src="https://sagecell.sagemath.org/embedded_sagecell.js"></script>
<script>
function makeAccessable(){document.querySelectorAll('.compute').forEach(function(b){var d=b.dataset.alt||"Interactive mathematical graphic.";b.querySelectorAll('img').forEach(function(i){i.alt=d});b.querySelectorAll('pre.sagecell_stdout').forEach(function(p){p.setAttribute('role','status');p.setAttribute('aria-label','Descriptive text generated by the interactive')})})}
$(function(){sagecell.makeSagecell({inputLocation:'div.compute',template:sagecell.templates.minimal,evalButtonText:'Launch the Interactive Applet Now'});makeAccessable();new MutationObserver(makeAccessable).observe(document.body,{childList:true,subtree:true})});
</script>
Part 2: Descriptive Content
Write (1) a description of the mathematical content you are illustrating and (2) provide instructions for using your interactive in Markdown, using the following template:
<!-- Part 2: Descriptive Content -->
# Page Title

## Overview

(Explain the mathematics here)

## Instructions

(Explain how to use your interactive here)
Part 3: Sage Code
Finally, insert the following to embed your Sage program.
<!-- Part 3: Sage Code -->
<div class="compute"
   data-alt="<Insert an accessible description of your interactive.>">
<script type="text/x-sage">

# COPY YOUR SAGE CODE HERE

</script>
</div>
Meeting Accessibility Standards
If you will be providing this interactive to students, you need to make it accessible.
- WCAG 2.1, Non-text content requires that "All non-text content that is presented to the user has a text alternative that serves the equivalent purpose".
- Think about how you would describe the interactive to a friend who cannot see it.
- Include all details required for them to understand the purpose and content of the interactive.
This description should be inserted into the data-alt field of the div that contains your interactive graphic.
You also want your graphic to be accessible for someone with limited vision.
- The way that Sage displays the current value of a variable is not tagged for used with a screen reader.
- The scripts in the template above label all of the
printoutput from the interactive as "Descriptive text generated by the interactive"
That means you can (and should) use print statements to narrate the interactive to the reader.
- Print the current value of any
slider, with a readable description, androundfor readability. - Use
ifstatements to display different messages depending on relevant image details. - This will benefit all students, by highlighting the relevant features in your graph
- This is called Universal Design
There are only a small number of exceptions to the non-text requirement. One is for non-text content in to a test or exercise (think an exam or a quiz, or possibly a homework or in class exercise). From Non-text content,
Sometimes a test or exercise must be partially or completely presented in non-text format. Audio or visual information is provided that cannot be changed to text because the test or exercise must be conducted using that sense. For example, a hearing test would be invalid if a text alternative were provided. A visual skill development exercise would similarly make no sense in text form. And a spelling test with text alternatives would not be very effective. For these cases, text alternatives should be provided to describe the purpose of the non-text content; of course, the text alternatives would not provide the same information needed to pass the test.